Hello all! How are you? Thanks for the lovely comments on my last post. ;) We are getting very excited!
Today I’m kicking off my no-spend August with a little redo for the bedroom. We’ve had short bookcases as our nightstands (you can see here) for years, but I wanted to replace them for many reasons – they were too tall for the new bed (and I was afraid I was going to lose an eye on the corner), they were SO dark in the room and the height made finding a lamp impossible. (It needed to be short but still substantial.)
SO. I started looking around. In my mind I’ve always wanted a small dresser on each side – maybe wood, maybe something I can paint. Something with at least a little CLOSED storage for me. (I learned from the bookcases.) I scoured Craigslist for months and nothing was coming up. I checked out antique shops and nothing was the right size and width (too wide). Then I started looking into a more traditional nightstand idea and looked at HomeGoods and TJ Maxx and nothin’.
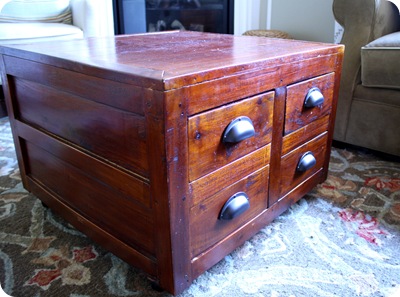
Then…I shopped my house. ;) Dur. We had two that worked perfectly – I just didn’t think they would work perfectly. So late one night I spent the evening dragging furniture around the upstairs to see what would work. We’ve had an old nightstand in the family for years that has been passed around and it’s been sitting in our guest room:

Here’s the thing. It’s not what I would pick – but it was here and free and I was determined to make it work.
The thing was a MESS. Seriously gross. I wasn’t crazy about the reddish stain and it was destroyed in a few places so I knew that was going. What really bugged me was the hardware, so I took it all off:

It was super easy to get that little jobby off – just pry it off with a flat head screwdriver then pull the nails out.
The nightstand got a VERY thorough cleaning:

I cleaned in all of the little crevices – this is so important, especially when painting over dark wood. You’ll see why in a minute. Grrr.
Because the wood was such a mess I gave the flat surfaces a quick sanding to get that top layer off, then cleaned well again.
I used this BIN spray to prime the whole thing:

I have used this stuff for years and have a love/hate relationship with it. It is GREAT primer and I love that they offer it in a spray. But the spray can SUCKS. Every single one I’ve ever used sucks. No matter how much I shake it, no matter the angle – the spray doesn't come out evenly. It spatters, gets super watery – it’s just hard to use. But I continue to because it’s great when you need great coverage on a hard to prime piece.
OK, so I used chalk paint for the coat of white after the primer. Here’s the thing (that I already knew, thankfully) about using white chalk paint over a deep, dark wood – the pigment can react with the paint and make it pink. So I was cautioned awhile back to always prime a dark wood piece well before painting with that paint. (Usually with chalk paint you can just start painting without priming, but this isn’t always the case with a red/dark tone piece.)
So I must have missed cleaning or priming one spot well because wow, it was a mess. No matter what I did (I primed it, painted it twice, reprimed it, then painted it twice again), some of the pigment was coming through on one spot. It looked nasty. Grody:


Ugh. Gross, right? I was so dang annoyed. The rest of the nightstand looks amazing, so I know I just missed cleaning right there or something. So I got my BIN primer in the can out and put two or three coats over it with a brush (pic on the right) and so far it’s doing much better. I still haven’t even tried painting over it again with the chalk paint because I’m afraid it’s going to bring that nastiness out again.
That part isn’t bright white like the rest of it but I think I’m willing to live with that because I don’t want to prime again!
The holes for the old pulls were so big it was going to be a pain to fill them in, so I ended up just placing the new ones right over the holes:

They were very strategically placed. ;) I’d much prefer them moved in a little bit on the drawer, but I pick my DIY battles.
I already had the pulls – got them for another project and didn’t use them there. I thought they would look so lovely against the white and I love how it turned out:

I’m seriously so pleased with it! I didn’t think I would love it this much!
Next up, the lamps. I have no idea what I’m doing with them yet, but they aren’t staying brass:

They were in the basement and I did a little switcharoo – SO much better this way!
I went with white on the nightstand for a few reasons. I’m still deciding on some accent colors in the room (I don’t want it to be all neutral), so this gives me a blank slate to work with. Plus I had the white on hand.
The big reason was I pulled a pedestal table that used to be in the Bub’s nursery in as the other nightstand. It was a piece I picked up from the unfinished furniture store and painted when I was pregnant and couldn’t bear to part with it. It was already white, so to pull them together I wanted them both to be white.
At first I thought it was going to be too tall, but it is the perfect height and size! Again…I’m trying to use what we have here. I don’t know if these will stay forever (I’d like something more substantial down the line), but for now they work great for us:


Yes, I still need to cut in that wall color by the floor. It’s on my list. A few other things need to happen first. :) And YES, that lamp cord will be dealt with. Buwhahaaaa.
So have you tried using chalk paint over a dark wood piece? How did it work for you? It will never cease to amaze me how paint and new knobs can transform furniture!
The best part – we have two “new” nightstands and I didn’t spend a dime! This no-spend month is going well, so far. ;)