Hey hey! How was your weekend?! We had a great one!
I worked on a project I’ve been wanting to try for awhile now. Our backyard redo is finally finishing up this week…and it’s been a long time coming. :) The landscaper and his team have done an incredible job and stayed right on track, but we’ve had many, MANY issues with the deck and staining it (which I’ll tell you about soon) and it’s pushed things back quite a bit.
I’m hoping I can show you the deck (finished) and the patio (finished) later this week or early next. Of course now that I say that, some random, freakish storms will come through and push it all back again…but I’ve come to expect that. ;)
Anyhoo…the patio is mostly done, and the outdoor fireplace is DONE and it ROCKS OUR WORLD! I’ve been trying to find a coffee table to place in front of the fireplace – we have some chairs set up around it and I knew a table in the middle would be the perfect set up.
So I went to a bajillion stores and of course…nothin. It’s September, after all. That’s like trying to find Christmas decorations in August. Well…wait. Not really. Cause that you can find.
But anyway, it’s impossible.
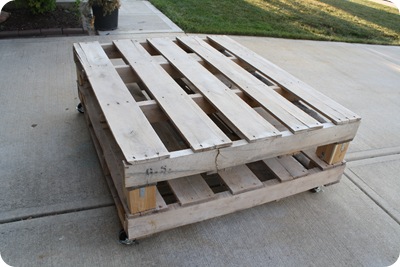
So I decided to make one. Our landscaper had plenty of pallets so I decided to recreate this project:
 (source)
I’m digging the slightly rustic, industrial look right now, and I love that it was large and in charge and it rolled. I’m obsessed with things that roll right now too, if you couldn’t tell.
So I got two pallets (free):
Then cut down 4 x 4’s to the height I wanted (four inches) for the legs:
I turned the top pallet over, as you can see. I attached the legs with brackets:
I attached the bottom part of the bracket first (onto the pallet), then put the leg in and then attached the sides of the legs.
Then, I turned it over and put it on top of the second pallet to make the table.
Because I couldn’t attach the bottom part of the brackets the same way I did before, I would line up the legs, place the brackets where they went, and then prop up the top part of the table while I screwed in the brackets:
Does that make sense? I did that for all four legs, then placed them all back into their brackets, and then attached the brackets into the legs.
Are you with me? ;)
Then, because I was trying to use what I had, I found some honkin’ washers from my stash to attach the casters:
I had to use the washers because the holes on the wheels were too large. The washers are ridiculously large and look goofy so it’s a good thing they won’t be seen. :)
I sanded it down to prepare it for a dark stain:
Annnnnnnnd…I didn’t like it. OK, not really. I mean, it looks fantastic. I love it – it just wasn’t going to be right for the patio.
I kept standing there trying to convince myself that it would work, but I just knew it wasn’t the look I wanted. It has some rough edges and is way dirty (underneath) – which I was OK with because it was going to stay outside. But I didn’t want to worry about the Bub playing around it either.
And it was just a tad too rustic for me.
Then the most important little detail came to me – uhhh…the table is wood. The fireplace has fiyah. Fire and wood – not a good combo. I mean, the fire isn’t shooting out, but the occasional ember will, and I don’t want to have to worry about that.
Why do I think of these things AFTER I spend an hour on a project?
So…it was on to plan B.
On a total whim I called a Menards about 30 miles away to see if they had more of the set we had already purchased (on clearance) a few weeks ago. None of the stores around us had any pieces left…but this location did. I couldn’t believe it!
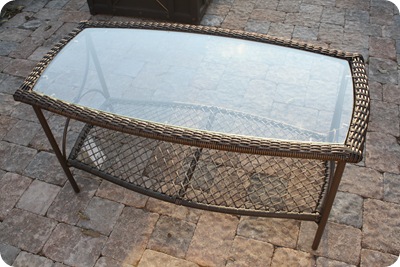
I got a great little coffee table for $50-something and it matches our furniture exactly:
Usually I’m not a “buy the whole set” kind of girl, but in the second week of September, I’m not pushing my luck. I bought that baby up FAST.
But one little issue was bugging me – it was too tall. Too high coffee tables are one of my biggest pet peeves. They are right up there with parking lots that don’t connect – HATE THAT.
Seriously…hate. it. Aren’t you glad you’re not me?? :)
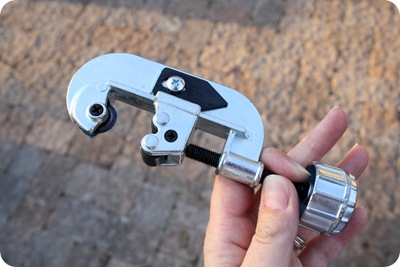
So I decided to take care of that myself. I cut down the legs with my plumbing tool:
I showed you how I use this baby to cut down my curtain rods here. It works like a breeze!
First I took the little feet off the table legs:
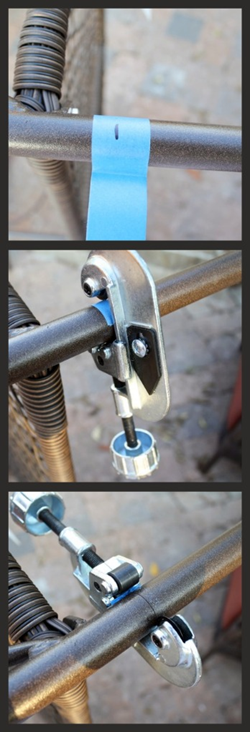
Then I measured five inches from the bottom and marked the measurement. I usually put some blue painters tape around the metal so I can clearly see where my mark is:
You just tighten the cutter around the metal and then turn it around and around – with every rotation, tighten it just a tad, and after a few rotations, you’ll get this:
A perfectly clean cut! It’s SO easy!
I pushed the little feet back in:
And now we have a much lower (it was 22 inches high, now it’s 17) outdoor coffee table:
I love it! It’s perfect! I find lower tables make a space feel much more intimate. And you can put your feet up on them much easier. That’s the main thing. ;)
Here’s a sneak peek of the patio – it’s SO awesome, I can’t wait to show you!:
(The Bub had set up a picnic for us. Sweetie pie!)
So…that was my long road to a table for the patio. The good thing – both projects were easy and super fast. The pallet table took less than an hour to put together, and the coffee table adjustment took about ten minutes.
And now I have a pallet table for sale! Ha! No, for real -- if any of you local Indy folks are interested, let me know. If not, I’ll take it apart and use the parts for a later project. :)
Have you started something that ended up all wrong? How did you fix it? Trash it? Walk away? Is it still sitting there? ;) Sometimes store bought is just right -- even if you do have to make a few little adjustments to it!
I will show you the whole space SOON!


Tidak ada komentar:
Posting Komentar