Tampilkan postingan dengan label laundry room. Tampilkan semua postingan

The Laundry Room: Making it work

Hello everybody! Hope your week is going well! I can hardly believe it’s Thursday already. Crazy pants.

I’ve been working on purging the basement (you can see one of my big projects earlier this week here) and it was when I moved on to the laundry room that I realized I haven’t shared progress in here since last year.

It’s been a year since I’ve blogged about this space when I built the shelf behind the washer and dryer:

When we got the new set I knew I wanted a top loading washer, so the little shelf along the back gives us a spot for some items we need within reach and it hides all the ugly stuff behind the set. :) 

But we’ve made some updates to make this a more functional space over the past year and although the room is still very much in between, I wanted to share some of them!

The room is smaller than we originally planned -- we had to work with beams in the basement so this room get a little tighter. It’s just over eight by five feet, which is still a dream compared to the mud/laundry room space we had upstairs before. A DREAM.

But with the washer and dryer taking up most of that space and a door to the storage room, I’ve had to be smart about storage and any additions in here.

We’ve always used one of those wooden drying racks that you open up on the floor, but this hanging rack from IKEA works just as well (and takes up way less space!):

ikea drying rackdrying rack

I wanted small laundry baskets that would stay in here all the time and last year I found ADORABLE polka dotted ones at the container store:

skinny laundry baskets

One for lights, one for darks. It’s so great to just grab one and just dump it in the laundry. And they’re tall and skinny so they fit perfectly right next to the dryer.

I’ve added some storage in here so the shelf behind the washer and dryer only holds the necessities now. My glass jar for the detergent and a little box hides the dryer sheets:

 laundry detergent in jarbox for dryer sheets

I like the necessities to be cute, alright? :)

We moved the ironing board down here and it hangs next to the door:

laundry room storage

We set it up right outside in the family room and watch TV while ironing. It makes it suck a little less. ;)

You can see a lot of the to do’s in the photo above – I installed that cabinet to use some of the awkward space in here and it needs to be finished up. I have ideas for the wall above it too. The storage room door needs to be painted (it will be black like the rest of the doors) and the trim all needs to be painted too.

One thing I did to help make this room a little bigger when we finished the space was to push it out to the family room area just a bit more than planned (to the right):

double doors to laundry room

That allowed me to put double doors on the room instead of a standard door. I LOVE it – I can easily carry baskets or armfuls of laundry through the door without banging into them. (And yes, they still need hardware. On the list.)

I still love love love the hexagon tile we put in here – it was so inexpensive and looks great. It is chilly on bare feet though so I have small mats in front of the washer and dryer:

laundry storage ideas

I’m always looking for one rug that would be the right size/color but it’s hard to find. These get dirty really easily so I don’t think they’ll stay forever.

And obviously we installed two small cabinets on the wall (that need to be painted) – I didn’t want it to be all cabinets and I didn’t want just shelving (I wanted some of the stuff to be out of sight), so we went with two. Initially I was planning on hanging a rod between them to hang clothes but quickly realized I didn’t want to look at that all the time. (And we really don’t keep clothes down here.)

So now I’m planning a mix of both hidden and open storage – shelves between the two cabinets. I’m also planning on bringing in more color to this space and doing some kind of treatment to that wall. Haven’t decided just what yet.

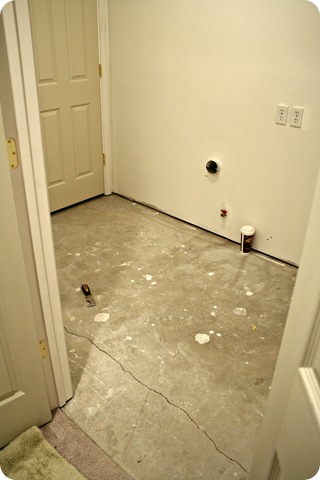
There’s still so much I want to do but it’s already wonderfully functional and it’s come a long way from how it looked just over a year ago:

hexagon tile floor

Compared to how it looks now:

basement laundry room

And yes…a year later I still LOVE having a laundry room in the basement. It was the right move for us but it may not be for everyone.

Do you have a big laundry room? Is it combined with your mud room or does it stand alone? This one is way bigger than the space we had in our old mud/laundry combo but I’m still always trying to use every bit of it as best as I can.

Would I do it again? (Laundry chute)

So every so often I like to update you on projects that I’ve done/purchases I’ve made to let you know how they’ve held up and if I like them as much as I thought I would. I’m always curious to hear that so I like to share in case you are wondering too.

I will say…I think and research and plan things to DEATH, so it’s rare that I regret doing anything. This one I’m still not sure about. :)

I shared our completed powder room a couple months ago and I’m so happy with how it turned out:

planked walls bathroom

We have a huge powder room, right? It’s big as far as powder rooms go. We could have made it a full bathroom (it’s near my office which could have been another bedroom), but we went with the half. Anyway, I’m so glad we have a linen closet in this room.

What you didn’t see at that reveal, and many of you have already seen, was the big honkin’ tube inside the closet:

pipe laundry tube pipe laundry tube

That is something I dreamed about for years and was SO thrilled to get installed. By now you’ve probably read the title of this post and deduced that this is our laundry chute. Smarty. ;) (You can see more about it here.)

What you didn’t see was the horrible, no good, did I mention horrible paint job I started last year. Originally I was going for red walls in this room and thought it may be fun to add a touch of red to the shelves (they needed to be painted anyway):

Ugh. I know. I mean, the photo is horrible but seriously…I KNOW. It was horrible. This one goes in the what was I thinking column.

I was going for white walls and bright red shelves, but somewhere along the way I got lazy and didn’t tape off (WHY?) so the paint got on the walls. And the PVC was always ugly -- initially I tried to get the lettering off the pipe using a method a reader mentioned, but it didn’t work for me. Then I thought, I’ll just paint it! Red! Like the rest of the closet! Brilliant!

Well red doesn’t cover well. Your tip of the day. So I stopped.

Anyway, I fixed it – more on that in a minute.

First up, the main purpose of this post. Would I do the laundry chute again? I’ve thought a lot about this lately and actually, I probably wouldn’t.

There’s a few reasons for this. The biggest – I never do laundry. I just…don’t. My husband does his own and I wait until I am out of clothes to wash my own. I will dig to the bottom of a drawer to find an odd sock before I will do laundry. It’s just my thing. I don’t hate laundry like I used to now that we have an actual laundry room, but I just don’t do it.

It’s my thing.

BUT. Because I don’t do it often, I wait till I can’t wait anymore and then I spend a day washing clothes, so in those instances it is nice to be able to just drop the clothes down the chute. Thing is, you still have to take the basket down to carry them back up when they’re done. So if I’m doing one load here or there I just take the clothes down in the basket because I’m going to have to bring them up in it anyway.

All that being said…our closet is a major disaster right now so I’m on a laundry binge. It’s laundry all the time – and I’ve been using the chute a ton.

Perhaps if we had more kids and more clothes I would use it more? Maybe someday when I’m totally and completely organized (snort) and I keep up with washing the clothes I will find it more helpful.

But for now…I walk the clothes down the stairs as much as I throw them down. I gotta say though – it’s fun. There is pure joy that happens when you throw the clothes down and hear them thump into the laundry basket. It kind of rocks. ;)

So…the chute is staying. Which brings me back to the hideous red linen closet. I finally painted it. The powder room was next on my decluttering rampage and like usual I couldn’t pass up this little DIY that needed to happen.

I used some paint I already had – it was a color called Billowing Clouds that I originally used to paint the powder room years ago. I didn’t want to spend a ton of time on this so I painted the walls and the shelves both the blue color: linen closet laundry chute

Oh, I did prime first that red first, just one coat. Since I was painting the walls it took no time at all. I was able to prime, paint and organize the stuff in here in a couple hours. I’ve put this off for a year, and it took less than two hours. Story of my life!

You may notice the polka dots. ;) Yes, I covered the tube. YES…I obviously have no life. It was just so ugly. I went through a few options in my head for covering it and then remembered I had some contact paper. AND it matched the new paint. It’s like it was meant to be!:

PVC laundry chute

See, I kind of have a life – I didn’t do the bottom part. Honestly it took about 15 minutes to cover it – and the dots make me smile when I open this door. :) I want to get some sticky tiles to put on the floor in there (I didn’t have the hardwoods put in the closet since the cuts would have been so tricky and added to the cost.)

By the way, a few readers wondered if that little bend in the pipe would keep things from going down and it doesn’t at all. Nothing has gotten stuck – even bulky towels and sheets because it’s so slick inside. So as far as laundry chutes go, this is a good one!

After decluttering the stuff in the bins in here I was able to get rid of one (that is a great feeling!). So even though we have half the space in here that we used to, everything still fits great:

DIY laundry chute

And it’s pretty cute, seriously. I say even though other people won’t see a space, if you have to look at it every day it’s your prerogative to make it cute. :)

SO. Overall I do like having the laundry chute, but if I could do it again I would have waited longer before installing it. I think I would have decided that we really didn’t need it after all.

Have you ever done something in your house you are iffy about? Regret any renovations or decisions you made? I don’t know if I regret this one really, I just would have waited to see how things functioned without it.

DIY laundry room storage

Hey hey! Thanks for playing along with our fun birthday quiz this week. ;) We’ll announce the winner (and the answers!) tomorrow.

Today I wanted to update you on the (basement) laundry room progress. I’m so excited about this space – it is a dream come true for me to have a dedicated laundry room!

It’s not a big room, but it’s mighty. :) My original plan was to make it much bigger, but with the bathroom placement that wasn’t possible. I’ve found it’s six by nine size is more than enough though. I LOVE it.

Last time I shared this room with you I had just painted:

light gray laundry room

As soon as the floors, trim and paint were done, we knew we could move the washer and dryer down. (I worked like lightning to get those done!!) We were about to install them when a little (awesome) randomness happened. You know those state unclaimed money sites? (Indiana’s is here.) Well, long story short -- we realized we had been missing checks for years that were going to our old address…it was a nice little surprise. :)

So hubby wanted to use that extra cash to get a new washer and dryer set. And I didn’t argue, duh. (He’s a keeper!!) We shopped around, found a set we loved, then went to Sears (just because we love their service), and they price matched the lowest price we had found ($200 cheaper than their price, each!), plus gave us 10 percent off…BOOM.

So anywho, we were lucky enough to get a new washer and dryer set and we got them for a great price. I’ll show you more of those in a minute, but first I had to come up with a solution for a problem I realized after they were installed.

You see, I had forgotten that the washer and dryer don’t go right up to the wall when installed. There’s all those…uck…CORDS. And hoses.  If there’s anything worse than cords, it’s hoses. They make me tremble just thinking about them.

So we lost a good six inches of floors space in the room, which in the end has been fine. But man, I did not love the mess of stuff you could see behind them:

hiding the stuff behind the washer and dryer

Yes, I know we are probably the only people that would see it. Yes, from the front you can’t really tell. But it drove me crazy. YES, I am weird! Welcome to Sarah’s mind.

So I came up with a solution and I’m tickled at how it came out. I’m sure I’m not the first to do this, it’s nothing earth shattering. I decided to make a shelf behind the washer and dryer – it would hide all that junk and be useful.

I used about half scrap wood, half some I picked up at the hardware store. I put a one by two into the wall as a “cleat” or support at the height I wanted the shelf:

shelf support

I just used long screws and secured it into the studs along the wall.

Then I just cut down and stained a piece of wood  (about six inches wide) that would lay on the top. I used my nail gun to nail it down into the supports:

And I had a shelf!

For a little extra stability, and because I had plenty of wood left, I put another wide board down the front on the left:

And to hide even more, a smaller board (1 by 2) on the other side:

Now you can’t see anything back there! YESSSS!

I still had a little wood left, so I created a shelf off to the side as well:

It does exactly what I wanted it to do – hides the ugly stuff, but keeps all of the laundry necessities within reach:

shelf behind washer and dryer for storage

I still need to add a coat of satin poly to the top, just to protect the wood (it makes it easier to wipe down as well). And this is by no means cute or styled, just functional – but I love it!

The washer and dryer are LG and we went with the top loader washer. I just didn’t want to deal with the mildew/sealer issues that I’ve heard about the front loaders:

laundry room storage

I’m also a throw-things-in-last-minute kind of girl, so I NEED to be able to add clothing in after the load starts. The top loader allows me to do that, from my understanding you can’t with the front loaders. We love these machines – the dryer especially. I love how it senses when things are dry – I used to check our old dryer at least three times each time we dried a load and now when it’s done I know the clothes are actually dry.

It’s the little things. :)

I love seeing the progression of how rooms come together – here’s the room with just drywall:

And with the tile floors, paint and the W/D set installed:

LG washer and dryer gray

Next I’ll share how I’m organizing this space, and what I hope will be a bit of pretty. :)

So are you a top or front loader person? :) Do you hate that empty space behind them as much as I do? Have you checked out your unclaimed site? Go for it – you may find you’re owed meeeeellions!! Or $50, whatever. It’s money. :)

Painting tips (and the laundry room walls)

Hey there! I’m back with another update on the basement laundry room. When we started finishing our basement in January, we decided to move the washer and dryer to a dedicated room down there. Some people thought I was crazy, but I can now tell you from experience, it’s freakin’ awesome. ;) (You can see the reasons why I did it here.)

I told you about the paint color plan for the basement a couple of months ago, and I knew I wanted to paint the laundry room this Pebble Beach color from Benjamin Moore:

pebble beach, benjamin moore

I got these matched at Sherwin Williams because I’ve fallen in love with that paint, and I got it for a great deal during one of their sales.

Since I was painting the laundry room, I figured this would be a great time to recap some of my favorite painting tips. I use these pretty much every time I paint and they keep the process as cheap as it can possibly be!

First up, the dreaded preparation. If I can avoid this part, I do. :) I showed you how I fill holes in the walls here and that’s still my method. But if there are small nail holes I’ll just quickly fill them with spackle and wipe away the excess (don’t even need to sand) or just leave them alone – paint fills them in if they are small. ;)

I saw an idea in Family Handyman a while back that recommends using nails to make holes in the rim of the paint can to prevent the paint from filling up that area and dripping all over the sides:

preventing drips on paint cans

I have tried it and honestly it didn’t do much good. I used large nails and lot of holes too – it just didn’t drain well. So I stick by my easy (but messier) method, which is just wiping the paint from the rim with my finger and onto my paint t-shirt:

painting clothes

I wear that one pretty much every time I paint. If I don’t have it on, I just grab a rag and use that. I always find it’s impossible to keep my hands completely clean while painting anyway, so why not just use them. ;)

I saw a tip from Sabrina Soto on HGTV once a while back that I still use – before I paint I grab painters tape and use it to clean off the roller:

frogtape clean off roller before painting

(You’ll be seeing a lot of that green FrogTape around here by the way, I’m one of the members of their new Blog Squad, whoot!!)

This way the fuzzies end up on the tape and not your walls! (And the cheaper your roller, the more fuzz you’ll get off, in my experience.)

Here’s another tip – it took me a while to realize this, but even if I’m painting a regular room with normal ceiling height, I put my roller on a pole, instead of holding the roller. It is SO much easier on your body to stand back and let the long pole do the work. My back and shoulders used to ache when I used just the roller. Now it doesn’t bother me much at all because I use the pole.

By the way, please don’t buy a pole at the store just for painting!! Any standard broom that comes apart (and most do) will attach to your roller:

use broom pole for paintinguse broom pole for painting 

You can’t tell from these photos but that red broom handle is covered with paint. ;)

As far as trays go, I just use the plastic liners as my tray, without a metal tray underneath. You don’t need it. I’ve tried the metal paint trays where the paint is supposed to peel right off and uh, it did not happen for me. Maybe it was the fault of the operator, but it was ridiculous. Save your money. :)

When it comes to small jobs where I’m just using a small foam roller, I will either just dump some paint on a couple paper plates:

cheap paint tray

Or I will skip the plastic tray all together and use up some of my plastic shopping bags and line the metal tray with it:

plastic bag paint tray

If you do this, make sure to turn the bag inside out if there is print on it. :)

I don’t buy the little handheld paint trays specifically made for cutting in with a brush. Instead I use coffee cups and wash them out after each use:coffee cup as paint tray

If you don’t have any (we don’t drink coffee so we don’t have a ton), you can get them for about 25 cents at Goodwill. They hold just enough and are the perfect size for a paint brush. The handle makes them easy to hold on to and carry around the room.

One more tip I learned years ago – if need to stop mid-painting and have wet brushes, stick them in a Ziploc bag or a plastic grocery bag (tied up) and they will stay wet for days.

Some say to put them in the fridge but I’ve never found it necessary – they stay wet just as long left out as well:

store wet paint brushes for later use

If I have paint left in a tray I’ll wrap it up in a bag and tie it up to keep it till I’m ready – that way I’m not trying to get all that paint back in the can (you’ll always lose some). You can keep used rollers ready to go that way as well! (Although I find they dry out quicker than the brushes.)

And when are ready to wash the brushes – you’ll love this little guy:

paint brush cleaning comb

This brush comb is about $5 but has saved me a TON in new paint brushes. You just brush it through while washing them out. It gets all the bits of paint out and leaves the bristles nice and straight while they dry out. I LOVE this.

So there you go! A few of my favorite painting tools and tips! If you have never painted and are nervous about it, don’t be. I hadn’t put a drop of paint on a wall in my life before the day we closed on this house. And that first day I painted our family room and it’s still the same today…so I did OK. ;)

Back to the laundry room -- here’s the space before we started:

And here it is after the tile was installed, Pebble Beach was painted on the walls, and baseboards and quarter round were installed:

light gray laundry room light gray laundry room white tile

I was up at the crack of dawn one morning scrambling to get that trim down so the washer and dryer could be installed! By the skin of my teeth, I tell you.

I thought this color was going to be much lighter than it was – but there isn’t any natural light so I think with that it would read MUCH lighter. I love it though – it’s coming together just as I had imagined! I’m going for a “rustic elegance” look in there – that term came to me after I started the shelves in here and I think it’s fitting. I’ll show you those soon! 

So do you use any of the tips I mentioned? Do you have any painting tips I missed here?  I love hearing new ones so share away!

**Don’t forget -- the next Show Us Your House party is next week and it’s time to show off family rooms! That one will go up Monday morning this time – probably around 10 a.m. EST. I know that will be different from my past link ups that go up at night so I wanted to make sure to let you know!

Have a great weekend!!

How to pick out tile (in the laundry room!)

Hello all! I’m making little bits of progress on a bunch of rooms right now – it’s decorating ADD at it’s finest. But at least there’s (some) progress, right?

I’m SO happy with how our basement laundry room is turning out! It so fun to have a new space to work with, I’m in heaven. And dare I say it – it’s not so bad when I have ROOM to do laundry.

Yep, I said it.

Anyhoo, I actually picked out the tile for this room months and months ago, I think before the room actually had walls. ;) I had always dreamed of this pretty hexagon tile from Lowes in the space:

white hexagon tile

I wanted something a bit different, something that was fun, but wouldn’t break the bank. And this stuff was perfect. (It’s called American Olean Sausalito tile.) But as time went on (and it was closer to the time of installing it), I got cold feet.

The tile is really thin, and I thought it was supposed to be used only on a backsplash. Even the guys who have been working on the basement were worried about using it.

I was so bummed, because I had planned on this stuff for half a year. :) So I did two things – asked some bloggy friends if they had used it, and went to Lowes to find out more about it.

The first bit of info I learned was from my friend Cassity at Remodelaholic. She told me that typically tile that is made for wall applications (like a backsplash) is white or cream on the back. Tile that is made for the floor is dark or clay colored on the back. Mine was dark on the back!

I had no idea! Good to know, eh?

Then Lowe’s guy showed me indicators on the tile box that helped a ton:

how to pick out tile

It was a wealth of information! I looked up what the codes mean and found this helpful pdf from Home Depot.

First up – the grade for this tile is a one (the highest quality) and you want to use grade one or two for floors, a three for floors.

The PEI (stands for Porcelain Enamel Institute) is a three – this indicates the tile’s resistance to abrasion. This one is fine for moderate wear and suitable for home use.

The little umbrella icon is for water absorption, which is something you want to think about for a spot like a laundry room! This one falls between low and moderate absorption so it was fine for this space.

Finally, one I didn’t even consider but is nice to know – the C.O.F., which is basically the slip factor. My tile was rated at .65, and anything above .60 exceeds ADA (Americans with Disabilities Act) guidelines – which means it’s too not slippery.

I was honestly surprised to see that my pretty little tile passed every test with flying colors!

SOLD! :)

Because I have limited experience with tile, and because the mortar had to be spread as thin as possible to avoid it seeping through all of those grout lines, I didn’t DIY this project.

The room had turned into a second storage room over the past few months, so I did clean it out and get the floors cleaned up:

I went back and forth on an underlayment in here, since the tile was going directly on cement floors. I talked to about four contractor-type peeps and every single one of them said it wasn’t needed. So I didn’t do it, but I’ll let you know in time if that was a good idea or not. ;)

Because I didn’t want to worry about keeping bright white grout lines clean, I used a light gray grout color:

warm grey sanded grout

This is the product I picked out (from Lowes) and it’s a sanded grout called warm gray. I love it!!

One thing to consider – one bag was more than enough for the square footage of this room, but obviously those tiles have more than average grout lines. So we needed two bags of the grout to get ‘er done.

I am SO thrilled with the result:white tile gray grout

The gray grout will be easier to take care of, and I LOVE how it actually shows off the pretty shapes of the tile. They would be lost with white grout!

After it was grouted and wiped down, I cleaned it well one more time, let it dry for an hour, and used this sealer the guys recommend:

one hour spray grout sealer

Other sealers I’ve used in the past can’t be applied till about three days after the grout is done. This one can be applied after just an hour. It was the easiest sealant I’ve ever used – I just sprayed it down on the tile, working my way across the room.

The floor will be super wet when you’re done, so work your way out of the room. Let it sit five to ten minutes then just wipe it clean! I got down on my hands and knees with two rags and wiped as I went through the room. It says you can do a second coat 30 minutes later, but I soaked this floor so I didn’t think it was needed:

white tile gray grout

Isn’t it pretty? It turned out just as I envisioned.

Here’s the after with the tile:

white tile gray grout hexagon

This room already looks SO much different now! I’ve been busy in here and I can’t wait to show you more!

Now I’m psyched to get the bathroom tiled and I think I might try my hand at it. I think. :) I’ve never done floor tile and I’m nervous. I was planning on going light on the floors in there too, but now I’m thinking dark, which I’ll explain soon.

This tile cost more than basic ceramic tile, but I thought for the unique look it wasn’t too bad – the whole room was less than $140. I’ve seen this look for WAY more so I’m thrilled with it!

Have you tried this pretty hexagon tile in your home? Have you ever tiled a floor? Any tips?

P.S. I think I said “grout” 55 times.