Hello all! Welcome to the first Show Us Your House party! I can’t wait to see the rooms for this month – your craft spaces and offices!
I had intentions of getting this first house party up last night, but we had a bit of a family crisis that was my priority. Around ten last night we noticed one of our kitties was looking just…not right. Her sweet face didn’t look like her and right away I knew something was wrong. I picked her up and took her to her food and water and tried to get her to eat something, and that’s when I noticed she could barely stand up. She couldn’t eat, drink, or walk without struggling.
I kept an eye on her for a few minutes, then noticed blood around her mouth and we knew immediately that the night was not going to end well. We took her to the ER doc at midnight and as the minutes ticked by she got considerably worse – I’ve never seen anything like it. I still can’t believe how fast it happened.
We found out she was suffering from kidney failure and it was taking her incredibly fast. The night before she was her old self…cuddling up with my on our bed (the fact that she could still jump up on our tall bed at 18 years old was crazy), “talking” to me before bed like she always does.
She went from her old self to horrible health in 24 hours. We only had about an hour to wrap our heads around it and then there we were saying goodbye to her. When they brought her back into the room so we could hold her, she was pretty much comatose. Her beautiful bright eyes just were not there anymore.
We held her and said goodbye and cried and cried. It was heart wrenching. I’ve had this baby girl since the day she was born…our kitty gave birth to a litter and she was one of them.

I haven’t had time to find recent pics of her, but you can see she was a stunner. :)
I love this one because you can see her “smile”:

She was the sweetest, best girl in the world. I miss her terribly. We’ve been moping around the house all day today…still kind of in shock. This is the second cat in about six months that we’ve lost. We’ve gone from four animals to two in a very short time. Our last cat is so sad today…it’s just awful. My heart hurts. I’ve had that sweet girl for half of my life.
So, it’s been a sucky few days…hubby has been sick with pneumonia and now this. (He’s doing much better but still feeling yucky.)
Anyway, that’s my very long story for the reason I didn’t get this up last night. I couldn’t help but show off our sweet kitty to you all before we got going with the post. :) Thanks for letting me share her with you.
Sooo…it’s time to move on to some details on my office reveal from earlier this week. First of all, I just want to say THANK you for all of the wonderful comments. I truly appreciate them and appreciate that you take the time to comment. It makes my day!
There’s a lot I want to share, so bear with me!
First, more about the layout. This room was tough for me because it’s like every other room on our main floor…very few full walls. The space is only about 11 by 11 feet, two walls have windows (which I LOVE), and two are cut off a bit by the angled doorway.
You might remember that for a long time, I had the desk and light on the left side of the room. First it was facing the doorway, then I changed it to face the wall.
It just felt weird to me though…awkward. So in the end, it was moved over by the windows:


For a while I had it angled in the corner facing out, but that was awkward too. In order to get around it to sit down, the table had to be too far out into the room.
One day recently I was cleaning the floors and moved the desk over a bit. I realized it worked great!:

I love it! And it only took forever to figure it out. :)
This way if I ever want a different view, I can just turn it the other way, and I’ve still got all that natural light!
Speaking of the desk, this was my third option for the room. It was EXACTLY what I wanted – a “real” vintage farmhouse table. I totally lucked out when a friend of a friend was selling it.
Unfortunately it was covered with lead paint. :) I had it professionally stripped down and then I painted it a very light blue. (Paint colors coming at the end of the post!):

I also changed the orientation of the desk so the legs went with the width. It is a HUGE surface and perfect for crafting or sorting mail.
Speaking of mail, I showed you how I figured out a process for controlling the paper that comes in the house here. All of my office supplies are organized in the Craigslist dresser (that I LOVE).
The mail and stuff that I need to go through goes in the box on top, then the papers that need to be filed in the basement go in the top drawer:
 The binders hold everyday stuff I want close at hand – house stuff, inspiration files and manuals for games and toys. This way I don’t have to run to the basement for every day things I need.
The other drawers hold lots ‘o stuff. Before I put a drop of paint on the walls a long long time ago, I did a serious purge of my office supplies. Did I really need four rolls of tape? Did I need ten packs of post its? Did I have to have 45 random pens and pencils?
No. :)
One drawer holds what office supplies I do use in pretty holders from HomeGoods:

The drawers are REALLY wide but very shallow, so these work great! I can fit a ton of stuff in there!
The next drawer holds my Silhouette machine, and all the fun stuff that I use with that, as well as my “junk drawer in a drawer” – it holds my go-to stuff like address labels, stamps, envelopes, my label maker and just STUFF:

When I sit down and go through mail, I pull this out and put it on the desk so I have stuff at hand.
The bottom drawer is dedicated to the kiddo – three more bins corral all of his goodies:

But most of his stuff is in the caddy to the left of the dresser:
And his sticker books, magazines, coloring books and Lego magazines have a spot in the book bin:

It was a Goodwill find years ago and used to sit in his nursery:

I put some castors on the bottom ($4 for four at Lowe’s) because it’s SUPER heavy and this makes it easier to move around the room.
The basket to the right of the cabinet used to house our little shredder and the cords:

We’ve since moved the shredder out to the garage, so now this holds bulky stuff like my tripod, camera case and laptop case:

Everything I need on a daily basis is organized in this room and I love it! I mentioned that I moved some of the bulky stuff to the basement (like the filing cabinet) and I’m so thrilled! (We already had one down filing cabinet down there so this way everything is in one spot.)
The printer/scanner is also in hubby’s basement office. This works great for us because he uses it WAY more than I do. It’s also wireless, so I can print from anywhere in the house, then file items right away.
At first I hid the modem and router under the dresser (you couldn’t even see them – YAHOO!), but when I moved the dresser I didn’t have access to the cable jack. So instead, I moved them to a spot in the house that has a free cable jack -- the guest room. :)
That room is hardly used, so it’s worked perfectly! (We have no problems accessing internet from anywhere in the house.)
OK, onto some pretties. :) The gallery walls around the room are probably my favorite part of the room, but they also took the longest. OH EM GEE.
If you can believe it, I already had every frame, but that’s because I had been collecting them at Goodwill for about a year. They were all different colored frames, which I liked initially, but it got to be too busy. And I wanted the art to shine!
So I sprayed them all white, which took FOREVER. I had to take the art/photos/glass out of each one, clean them off, prime them twice and then spray them satin white twice.
FOR.EV.ER.
And hate me, but I didn’t cut out paper the size of each frame (like I’ve seen in mags) to figure out where I wanted each one on the walls. I just piled the frames in the room, started at one end of each wall, then picked different sizes that worked here and there.
Yes, I had to move a few along the way, but it’s just holes people. Itty bitty holes. You can’t even see them, can you?:

;)
Most of the art is the Bub’s or my photos. Here’s the lowdown on the art and other stuff on this wall, left to right:
Art by stepdaughter (of the Bub)
Angel by Bub
Circle art by Bub
Statue of Liberty shot
”S” from old sign – Midland Antiques Indy
Blue/yellow art by Bub
Bub by me
Bouquet art by Bub

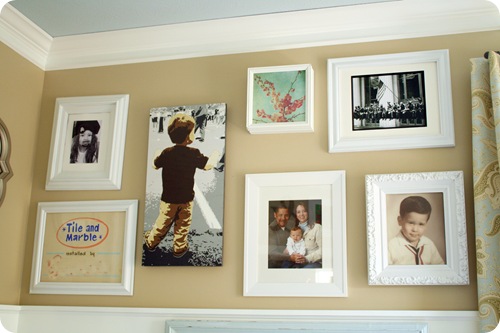
Left to right:
Hubby and I photo
DIY printable
Photo of Bub and Daddy
Photo of Hubs and I on the first flight he took me on.
Sweet stepdaughter
Art by Bub (Christmas tree but it’s staying up – I love it)
Poster I cut up to fit into frame (You can see more of that art here.)
Target mirror I spray painted metallic color
(Still looking for something tall and skinny to put over to the left!)
Left to right:
My little pirate at Halloween (arrrgh)
Vintage sign from late father-in-laws business
Art from this post (LOVE)
Cherry blossom photography
Family photo
Photo of Skyscraper Lunch sculpture from Ground Zero, January 2002
School photo of my late brother-in-law (beautiful frame was from fil’s house)

Left to right:
Clock from Garden Ridge
Goodwill oval frame
DIY silhouette in GW frame
Sunflower photo that used to be here
Photography from here (Gorgeous! Matches the room PERFECTLY.)
Butterfly photo
Photo of the kids in NYC
Flower photo
I wanted to have something on each wall that wasn’t art and wasn’t white, so that’s where the clock, industrial “S,” mirror and the Modern Bird art (absolutely LOVE it) come in.
I couldn’t be more thrilled with how it all came together. :)
That cutie little aqua table above started out as a table I found at my late father-in-law’s house. It was rickety and in bad shape – I took it apart, cleaned it up, tightened it up:

Because it was round, it stuck out into the room quite a bit:

So I used my jigsaw to cut it down, then reattached that piece with “L” brackets so it looks like a drop leaf table:

It saves us about six inches of space right there, and I’m all about that!
Whew!! Almost done!! :)
The drapes are a Waverly fabric I found from Joann’s forever ago. It is still there though. :) The striped fabric on the DIY memo board goes with it perfectly, and they were the very first picks for this room. The whole space was designed around them!
I made the drapes myself – lined and everything. ;) They aren’t sewn perfectly, but you can’t tell, right?:

Now I wish I would have picked a different fabric for the pendant light, but that was one of the first projects I finished, and I had planned on it hanging on the other side of the room away from the drapes. Oh well…I’m not touching anything in here for awhile, so it’s good. ;)
Here’s a rundown of a few ton more details…
Paint colors
Desk: True Value, Soft Hearted
Kid table: Valspar, Pond
Memo board frame: Dutch Boy, Purify
Walls: Ralph Lauren, Sisal, lightened 25 percent
Ceiling: Dutch Boy, Purify
Sources:
Lamps, large basket: Target
Organizational items on and in dresser, chair and pillow: HomeGoods
Binders: Nakedbinder.com
Fabrics: Joann's
Dresser: Craigslist
Knobs on dresser: Hobby Lobby
Frames: Goodwill
Rug on chair back: IKEA
And here are links to the long list of projects that made this room happen!
Desk redo
Priming the formerly dark room
Painting the walls
Installing crown (I later chunked it up a bit by adding a piece of molding two inches down, then painting in between.)
DIY memo board (made from insulation board and a GW frame)
Board and batten how-to
Organizing the paper
Desk chair redo (from a pleather parson’s chair to a no-sew covered chair)
Spraying the board and batten
Pottery Barn art caddy redo
How to make your own printables tutorial
(Live Writer is hating me again, so those links are not highlighted right.)
And if you missed it, the full reveal is here!!
Dang, I’m tired!!!
So let’s see YOUR spaces! I still don’t have a button for this shindig, but I would appreciate it if you would link back here in your post! Thanks so much!


