Tampilkan postingan dengan label lighting. Tampilkan semua postingan

Making an outlet or switch flush

Hello and how are ya? Today I’m sharing a quick solution to a problem I run into quite a bit – only because I’m constantly putting planks/board/trim on my walls. :)
I had to do it on our beadboard backsplash:
beadboard backsplash
And on the board and batten/beadboard island:
beadboard island
And in the planked walls powder room as well: wood planked walls
Any time you put anything on the wall that adds to the thickness you’ll have an issue with the outlets and switches – the outlet itself won’t be flush with the wall anymore, like this:
making outlet flush with wall
Of course to avoid this you can just cut the wood around the switch plate so it stays against the wall, but I like the cleaner look of having it go behind the switch or outlet plate. I had the same issue in the mud room near the bench I am building:
DIY bench with kitchen cabinets
I had to just tape the covers back on for the time being since the screw wasn’t long enough to even hold them on. The beadboard isn’t that thick but you need to make adjustments to make it work.
It’s actually very easy to do and very cheap. You’ll need these plastic spacers from the electrical aisle:
electrical spacers
First thing you need to do is make SURE the power is off to the outlets or switches your working with. Turn them off at the breaker, then double check with a voltage tester like this:
voltage tester
No light or a short light and/or beep means the power is off.
But you’re not done -- plug something into it to triple check that it doesn’t work. And THEN check it one more time by using the detector on the screws next to the outlet:
making sure power is OFF
The light went on and it beeped continuously, which meant there was still power coming from somewhere. This one must be wired to the light in the room -- I turned off the breaker to that light and then all was good.
I know electrical work can be scary but once you are sure it is OFF, you are good to go!
You’ll want to take the two screws out of the outlet so it comes loose a little bit:
adding spacers to outlet
And then you just need to figure out how much space you need to make it flush. So for this one I tried a few different numbers and ended up with five spacers – you just fold them accordion style and they snap together:
adding spacers to outlet
Each spacer is 1/8th of an inch, so you can measure to see how far out you’ll need – so 5/8’s of an inch would be five spacers. I just do the trial and error method because the measuring doesn’t always work perfectly for me.
Then you just put the screw back in and slide the spacers on it behind the outlet:
adding spacers to outletDo this for both the top and bottom screw and then tighten them like usual. You may need a longer screw if you need to add this much behind the outlet or switch – I had to get longer screws because the ones that were there were too short with the spacers added.
When you’re done put the plate back on and you're good to go!:
Adding spacers to outlet to make it flush with wall
Of course this works when installing tile too. If you tile your backsplash you’ll want to use these to make the outlets flush against the tile instead of inset.
Here’s the before and after to show you the difference again:
How to make an outlet flush with wall
By the way you’ll need these if you use the pretty switch covers I told you about here:
light switch covers They are pretty thick and will need a spacer or two to make the switches flush again. (On that outlet we have dimmers installed, that’s why the switches are different.)
Hopefully this will help if you ever run into this problem! It’s really a very easy, fast fix and the package of spacers are pretty cheap. (And they last forever.) Have you ever used these little plastic doodads?

Glossy navy blue LOVE

Hello my friends! How was you weekend? We picked about 15 pounds of apples and one day this week I’m going to try making applesauce for the first time. It should be interesting. Wish me luck.

I got one big DIY project and a small one done this weekend and I’m equally excited about both of them. We’ll start with the smaller one today since it’s prettier. ;)

As some of you know, our master bedroom is going through a (sloooooow) metamorphosis. It started with new bedding I picked up months ago and then a DIY headboard and some paint. I still haven’t finished painting because I’m still deciding on the color. It may change. We’ll see.

I’m not one to knock my old decor, because at each point I loved where I was. Does that make sense? Deep. Anyway, I’m changing up our bedroom because I was just wanting a different look. We had the same paint up for eight years and I was itchin’. I sold our bed on Craigslist and I’m trying to use the cash from that to makeover the whole room.

At first I was hoping to reuse the sconces we used for light before:

sconces above bed

I did love having the light right above my head for reading. But the only reason those worked was because the bed was so tall – regular lamps wouldn’t work for us (the light was too low). And now that the bed is back near the ground again those sconces looked too teeny. SO. I ended up bringing some brass lamps up from the basement:

painting a nightstand

To see that nightstand redo go here. Your 80’s nightstand will thank you. ;)

I know many of you dug the brass as it was and I totally get it. I think in a different setting I may almost kinda maybe leave it as is. I’m not quite there with the shiny brass yet (I love an antiqued version, still not sold on this coming back). And they weren’t in the best condition either – they both had some areas that were corroded/worn/not sure what to call it. And both had stickers on them (for YEARS?) that I just couldn’t get off all the way (I had to just spray over them). 

So they needed some paint. I just couldn’t decide on a color. I didn’t want to go with a silver because I thought that would be too cold feeling – I wanted to warm up the space a little. The bedding has a blue/grey color in it, and I actually have a color that matches that pretty well – but I wanted more contrast than that.

And then one of you (LilClementine) suggested navy blue and the heavens opened up – THAT was the one. I picked up some glossy navy blue paint the other day and gave it a go. I started with primer – on a shiny metal like this it’s never a bad idea. All I had was a black primer so I just used that:

spray painting a lamp

I knew immediately I was going to like them more painted. I think the pretty lines of the lamp were lost with the shiny metallic. When painted a deeper color you can really appreciate them. I think so anyway.

And then I pulled out the blue. I was so hoping it would turn out like it was looking in my head:

navy blue spray paint

It did. :) I absolutely, totally LOVED it. Brilliant!!

I had some navy blue ribbon in my stash so I just wrapped it around the bottom of the lamp shade to tie it in a bit:

ribbon on lamp shade

So here’s the thing – the navy blue isn’t in the bedding or anything else in the room really:

how to spray paint

But there will be more of it now. ;) The older I get the more I realize things don’t have to match exactly. I think if I had used a color that was a match it wouldn’t have made the same impact. I love how it brings a bit of contrast and drama to the room:

navy blue lamp

Right? I LOVE them. Now I want to pull some navy into some pillows maybe, or in the drapes? I don’t know, like I said, this room is slow going so I’ve got time to decide. ;)

Yet again…if you haven’t used spray paint to transform something, do it. Today. OK, fine -- maybe later this week if you’re busy. Short, small burst of paint, not long ones. Move it quickly across the surface, don’t concentrate on one spot too much. Numerous quick coats are better than one heavy one.

Next up I need to finish the painting. Figure out what to put above the bed (the mirror just went up there to fill the space for now). Drapes. Recover the bench at the end of the bed. New floors?? We’ll see.

It’s coming along though and I’m really pleased with it (and my navy blue lamps) so far:

tufted headboard

What’s the last thing you spray painted that you loved? The best part about it – if you don’t like it it takes just a few minutes to change it again. Seriously the easiest way to change up your decor that I know of.

New kitchen nook, complete!

ranunculus flower

Hello there! I’m back! Last week was crazy – I flew across the country to Salt Lake City to speak at the SNAP! Conference and then hurried home after my session (I was there for about 36 hours) to get home in time for an event honoring my hubs Friday morning.

And then…it was cancelled. You gotta be kidding me.

We had SO much rain last week and the school had flooding so it was postponed. I was glad to be back home though, so all was OK in the end.

I’m back with the full picture of how the kitchen nook turned out. I first showed you how I transformed an IKEA table into a farmhouse table here. Thanks SO much for all the lovely comments by the way! They make my day!

Well, the next phase was new chairs. We have had the black chairs in there (from Garden Ridge) for about seven years now – they’ve held up OK. A few scratches but mostly OK. But the thing that bothers me about them is that the legs become loose ALL the dang time. I am tightening the bolts on them at least once a week.

I had fallen in love with a different chair too – and for months I was dreamin’ about it:

Willliams Sonoma chairarhaus x chair

(1/2 sources)

I ADORE these x-backed chairs. The pretty curves, the warm wood. LOVE. But these were way more than I wanted to spend. (One was $150, the other $200.)

So I watched for months and stalked Home Goods and never found anything. And then it hit me to check out World Market. Yes, again. I love that place:

x back chair, world market

I got them on sale so they were wayyyy cheaper than the other two versions and I only got two because I had a plan for the other side of the table.

Many of you guessed it – a bench. I mean, it’s practically begging for it, right? We’ve had one for years that I used to use at the round table we had in here. It’s been sitting in our mud room for a while now, so I pulled it out, primed it, then gave it a fun color:

spray painting a bench bench at table

That color is apple green by Valspar by the way –- I was trying to use a color I had on hand. It was brighter than I first wanted. When I asked hubby what he thought he mentioned how well it went with the boxwood wreath on the pantry door, the island chairs, the flowers on the table…the man is good:

ikea table turned farmhouse table

I love the pop of color – this nook has had no color for so long, I’m happy to bring some in. And the best part about spray paint – it will take me 15 minutes to change it up if I ever want to.

Someday when the budget allows (and they are on sale again) I’ll pick up a couple more of those chairs to have for when we need more seating. For now this set up works great for just us.

The last change to this space was a new light, also from World Market. I had been eyeing it for months but was afraid I wouldn’t like the leafy things on it:

gray antique chandelier

I went to see it in the store and it was GORGEOUS.

I’ve changed the light over this table at least five times now – the rest of the lights in our house have never been changed or replaced once. This spot…I don’t know what it is.

But I finally feel like this is the perfect combo – the size and look of the table and the pretty chandelier – it works now. I promise not to change it out again for at least a year. ;) I have a plan for our other light that was there – once I can find someone to climb 20 feet to install it. (Not it!)

Of course all of these changes happened over the course of a couple months – and I did my research on everything for six months to a year beforehand. (YES, I take forever.) Once I decided what I wanted I picked up different pieces as the budget allowed.

I’m SO thrilled to have a big table to use again. And yes, to decorate:

ikea table turned farmhouse table

I may have to do a spring tablescape just to celebrate. And can I just mention I am OBSESSED with ranunculus. I love these flowers!

Someday I’ll learn how to properly take pictures so the light streaming in the windows does not blind us:

farmhouse table with bench thriftydecorchick.com

But today is not that day. ;)

I ADORE these chairs – they are really sturdy and the wood that makes up the “X” is too – I tried out some that were really flimsy and way more expensive:

x-backed chairs world market

I especially love this spot with the light on a dimmer in the evening:

farmhouse table with bench thriftydecorchick.com

It’s just so much more open and bright now! I cannot even believe the difference, I really can’t.

We all love this table – the size and shape just works so much better for this space. It’s so much easier to spread out on the computer, for homework – all that stuff too:

farmhouse table with bench thriftydecorchick.com

The round table felt so cramped in comparison.

And now that this spot is transformed, the budget is frozen for a while. This was happening while I took pictures this morning:

water hates me

More water issues. The disposal stopped working and (gross) water was POURING out of the disposal. Didn’t know that could happen? Me either. Fantastic!

There are a few more changes coming to the little kitchen nook – and many more coming in the kitchen (someday). But for now I have a pretty table that I love. :)


**For more info on the chalkboard wall, go here.
**For more on the pantry (with the glass door), go here.
**And to find out how NOT to paint your glass atrium door, go here.

Library lights (finally!)

So I mentioned last week that I finally ended what was a four month long search for lighting for the dining room bookcases I am finishing up.

Actually four months is conservative. I think it’s probably been more like eight. :) When I last blogged about the bookcases, this is where we were:

DIY built ins with bases

I said I was going to be finished with them in September. I was wrong. :)

Now, I’m aiming for end of October. I think I’m gonna be able to do it.

Anyway, see those spots at the top? Those are where the lights were supposed to go. The lights I. could. not. find. ANYWHERE.

Until last week. ;)

Now that I’ve gotten over the HUGE hump that was the lights, I’m SO ready to get this done! When we first started this project (ohhh, back in March), I showed you the lights I had picked out for the tops of the bookcases:

plug in spotlight

They were little plug in spotlights that I was going to hardwire in. But they were dinky, and my whole goal with them was that they would be directional, so I could direct the light down over the built ins. These didn’t stick out enough to really be able to cast light over the shelves.

So, I moved on to my next idea. Hardwiring a picture light, like this:


plug in art light

This one is from Lamps Plus, for like $70. You can find the exact same thing at Lowe’s for about $30. (I showed you how I used one of them here.)

Anyhoo, Dad and I were standing at Lowe’s one day, about to put four in the cart, when he noticed something – the arch at the top of the light wasn’t going to work. We put in a header at the top of the built ins, but it was only eight inches tall. These wouldn’t work because they were too tall.

Bummer dude. Seriously.

So that was forever ago, and since then I’ve looked online everywhere. This was perfect:


SINGLE LIBRARY WALL LAMP(source)

Again, a plug in I believe, but they are easily hardwired.

But this one was more than $200. Each. I needed four. Not happening.

This one too…gorgeous:LIBRARY WALL LIGHT

(source)

About $250 I think? Choke.

I loved the long arms on this, and I knew I could pull it out away from the wall so it would work with my clearance issue:

swing arm library light

(source)

But again…more than $300.

It was getting frustrating. I looked at sign lights (too big and expensive), I looked at lamps I could hardwire (way too big).

I considered something like this from IKEA:

ikea wall light

Only $20! But it was too small, the wrong color and four hours of driving to get it. :)

I was starting to feel like Goldilocks. ;)

Lamps Plus had this:

(source)

But the light part didn’t move. So when it was installed it would just shine light down to the floor. Not the look I was going for. They had another version I found over labor day that was $95, and I was thisclose to ordering them, but I held off cause I still didn’t want to pay that much.

Of course a few weeks later when I was so frustrated I was considering it, those were gone. :)

So the other day I had had it. I tried one more place -- a local lighting store and they carried exactly what I wanted. For $170. And a six week wait.

I was totally defeated. But I was determined to find something that day. I had already looked everywhere fifteen times, but something took me to Home Depot (again). I had a feeling I’d find something. (I really did…I have a weird sense about these things.)

This time, I had a different idea. I’d look at the outdoor lights too.

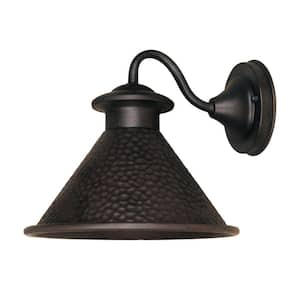
And wouldn’t you know it. I found the one:

home depot bronze outdoor light

They had two sizes, and I went with the bigger one. It’s a dark copper/bronze, which is what I wanted. The clearance was good for the ceiling, and it was the perfect size – not too big, not too little. The bracket was the perfect size for the header. The light didn’t tilt like I wanted, but that was an easy fix – I just bent them ever so slightly myself. :)

You can see this one online here, but the funny thing is that it’s listed for $90 online – they were only $35 in the store! So I got all four lights for $140 – basically $100 less than ONE of the fancy ones would have cost me.

I was thrilled but didn’t want to get too excited till I got one up to see how I liked it.

I LOVED IT:

outdoor light fixture inside

They don’t stick out as far as I had originally wanted, but I realize now that may have bugged me to have them eight to 12 inches out from the wall.

IMG_3352

Ignore the unfinished top. :) My plan is to add crown around the top and there is just enough room to get it up there.

They were a breeze to install – I just screwed the wall bracket into the wall and then wired it up. Light fixtures are usually my nemesis but these went up so easy and fast. That never happens to me when it comes to lights.

In the store they used the little round light bulbs instead of full-sized ones, and I loved that look. I don’t want to see the bulbs at all when you’re standing in the room:

bookcase light

With the little tilt that I added, they shine down onto the shelves beautifully:

outdoor lights turned bookcase lights

Love them!! I couldn’t BELIEVE after all this time I found them at that price, and in the outdoor section of all places!

Of course this is just a peek – the painting and some trim isn’t done. The accessorizing and arranging isn’t done either. But I am thrilled with the lights – they are just what I imagined in my head when I started dreaming this up almost a year ago!:

inexpensive library lightsI cannot tell you how great it is to have these up!! I added a dimmer, of course, so they are on all day long lately. And today was perfect for pictures because it’s a dark and stormy one. ;)

Of course my gauge on projects is always the Bub and the hubby – their reactions tell me a lot. My husband loves them and I got an actual “Ohhhh and ahhh” from the kiddo, so I always take that as a good sign.

Thanks for being patient with me on this bookcase project – they have been a labor of love but I had NO idea they would take this much time. I hope to have a full reveal for you soon!

Hooooolla!